Order Blocks: The Complete Mastery Guide for Stock Traders (2026)
Master order blocks in 2026. Learn how to identify, grade, and trade bullish & bearish OBs, breaker blocks, mitigation blocks, and the OB+FVG confluence entry — with step-by-step examples for stock traders.
Introduction
Every time you've been stopped out by a few points before price reversed in your original direction — an institution was at work.
The spike that took your stop was not random. It was deliberate. And the price level it reached? That was an order block — a zone where institutional money had previously entered, still had unfilled orders resting, and needed retail liquidity to reposition.
Once you understand order blocks, those moments stop feeling like bad luck. They start looking like roadmaps.
Order blocks are the single most precise entry tool in Smart Money Concepts. They tell you where institutions placed their orders, why price returns to those levels, and when the highest-probability entry exists. In 2026, order blocks combined with fair value gaps and liquidity sweeps form the most complete institutional entry framework available to retail traders.
But there's a problem.
Order blocks are also the most misapplied concept in all of SMC. Traders mark any candle before a big move and call it an OB. They enter without structure context, without grading the quality, and without understanding the difference between a valid institutional zone and a random price area. The result: a "system" that works in hindsight but loses money live.
This guide fixes that completely. You will learn what order blocks truly are and why they work, every type of OB and how to identify each one precisely, a 5-point grading system to rank setup quality before entering, three distinct entry models matched to your risk tolerance, stop loss and target methodology, and the most common mistakes — with exact fixes for each.
By the end, you will have a complete, rules-based order block trading system for stocks.
TL;DR — Key Takeaways
- An order block is the last opposite-colored candle before a strong impulsive move that breaks market structure
- Three conditions must ALL be met: last opposing candle, displacement, and Break of Structure (BOS) — missing any one means it is NOT a valid OB
- Standalone OBs have a 52% win rate; combined with BOS/CHoCH confirmation, win rate rises to 65–68%
- OB + Fair Value Gap confluence is the highest-probability configuration in SMC trading
- Unmitigated (first-touch) OBs have significantly higher probability than previously tested zones
- Three entry models exist: limit at OB, wait for FVG inside the OB, or wait for lower timeframe MSS — choose based on your risk tolerance
- Stop loss always goes beyond the OB wick — never inside the body
- Higher timeframe alignment is non-negotiable — a perfect OB fighting daily structure is a losing trade
Part 1: What Is an Order Block? The Institutional Logic
The Problem Institutions Have (That Creates Your Opportunity)
To understand why order blocks exist, you first need to understand the challenge that large institutions face every single day.
When Goldman Sachs wants to buy 10 million shares of Apple, they cannot click a market buy button and fill the entire position at once. An order that size would immediately drive the price upward — against them — creating massive slippage before the position is even half-filled.
Instead, institutions must accumulate their positions patiently, over time, using multiple approaches:
- Iceberg orders — large orders split into smaller visible chunks that conceal their true size
- Algorithmic execution — automated systems that spread buying across time and price levels
- Engineered price moves — pushing price in one direction temporarily to collect the liquidity (the stops of retail traders) needed to fill large orders in the opposite direction
The result of this process is visible on every price chart. The zone where an institution executed a large block of orders — before the strong directional move that followed — is the order block.
The Formal Definition
An order block (OB) is the last opposite-colored candle before a strong impulsive move that causes a Break of Structure — confirming market structure has shifted.
Breaking that definition down:
- Last opposite-colored candle: For a bullish OB — the last bearish (red/down) candle before the bullish impulse. For a bearish OB — the last bullish (green/up) candle before the bearish impulse.
- Before a strong impulsive move: The departure from the OB must be displacement — large, decisive candles showing institutional urgency.
- That causes a Break of Structure: The impulse must break a meaningful prior swing high (bullish) or swing low (bearish). Without a BOS, the move lacks institutional significance.
Why Price Returns to Order Blocks
Here is the insight that makes OBs genuinely predictive rather than just historically interesting.
When an institution places a $300 million buy order, it cannot fill the entire order in a single price move. It fills portions of the order — perhaps 60% of its desired position — before price moves away. The remaining 40% of unfilled buy orders remains at those price levels.
When price eventually returns to the OB zone, two things happen simultaneously:
- The institution fills its remaining orders at the same favorable price level (completing its accumulation)
- The institutional buy orders defend the zone against further selling — causing the price reaction that traders observe
This is why an unmitigated OB is not just a historical support level — it is an active institutional position where real orders are waiting. That distinction is what gives OBs their edge over traditional support/resistance.
Pro Tip: Order blocks are identified retroactively. You can only confirm an OB after price has made a strong impulsive move away from the zone. This is by design — the institutional move away from the zone is the confirmation that significant orders were placed there. You cannot identify a valid OB in advance.
Part 2: The Three Mandatory Conditions for a Valid Order Block
This is where most SMC traders go wrong. They mark zones loosely — any candle before a big move — and then wonder why their "OBs" don't produce reactions. Valid order blocks require all three conditions simultaneously. Missing even one disqualifies the zone.
Condition 1 — The Last Opposing Candle
For a bullish OB: It must be the final bearish (red/down-close) candle before the bullish impulse begins. Not one of many bearish candles during a pullback — specifically the last one.
For a bearish OB: It must be the final bullish (green/up-close) candle before the bearish impulse begins.
Why this specific candle? The last opposing candle is where institutional orders were being absorbed against the prevailing price flow. When price was falling into the OB zone and one final bearish candle formed — that is where institutional buyers were accumulating, absorbing the remaining sell pressure before launching the bullish impulse. The earlier candles in the pullback are retail-driven noise; the last candle is where smart money executed.
Common mistake: Marking the entire consolidation before a big move, or selecting a candle several candles back from the impulse. Only the last opposing candle qualifies.
Condition 2 — Displacement
The move away from the OB candle must be impulsive and displacement-driven. This means:
- Large candles with substantial bodies relative to their wicks
- Minimal overlap between consecutive candles in the impulse
- Clear, decisive directional momentum — not a grinding, overlapping move
- The displacement candle should be 2–4x the size of the average candle in that market context
Why displacement matters: Displacement is the visual signature of institutional urgency. When institutions execute large orders, their buying or selling creates an aggressive, one-sided price delivery that leaves behind the large candles and fair value gaps characteristic of displacement. A slow, grinding move — even if it eventually breaks structure — lacks this institutional fingerprint.
Volume confirmation: On US stocks, volume is available and provides additional validation. A displacement move on volume 1.5x–2x the 20-period average confirms institutional participation. A move breaking structure on low volume is suspicious — it may be retail-driven or a false breakout.
Condition 3 — Break of Structure
The impulse from the OB must cause a Break of Structure (BOS) — it must break a meaningful prior swing high (for bullish OBs) or swing low (for bearish OBs).
This condition alone eliminates approximately 60% of falsely identified order blocks that appear in retail traders' analysis.
Why BOS is required: If the move from the OB candle didn't break structure, the zone lacks institutional significance. The purpose of institutional order placement is to move price in a direction — specifically, to break through prior structural levels where liquidity is resting. A move that fails to break structure suggests the "OB" was simply retail-driven volatility, not a genuine institutional accumulation or distribution zone.
The implication for trading: When price returns to a zone where all three conditions were met — last opposing candle, displacement, BOS — you are entering a zone with confirmed institutional interest. The orders that drove that impulsive BOS move are still waiting at that level.
Warning: Apply these three conditions as a mandatory checklist before marking any OB on your chart. If even one condition fails, do not mark the zone. The discipline to reject invalid OBs is what separates profitable OB traders from those who draw dozens of zones and get random results.
Part 3: Types of Order Blocks — Every Variation Explained
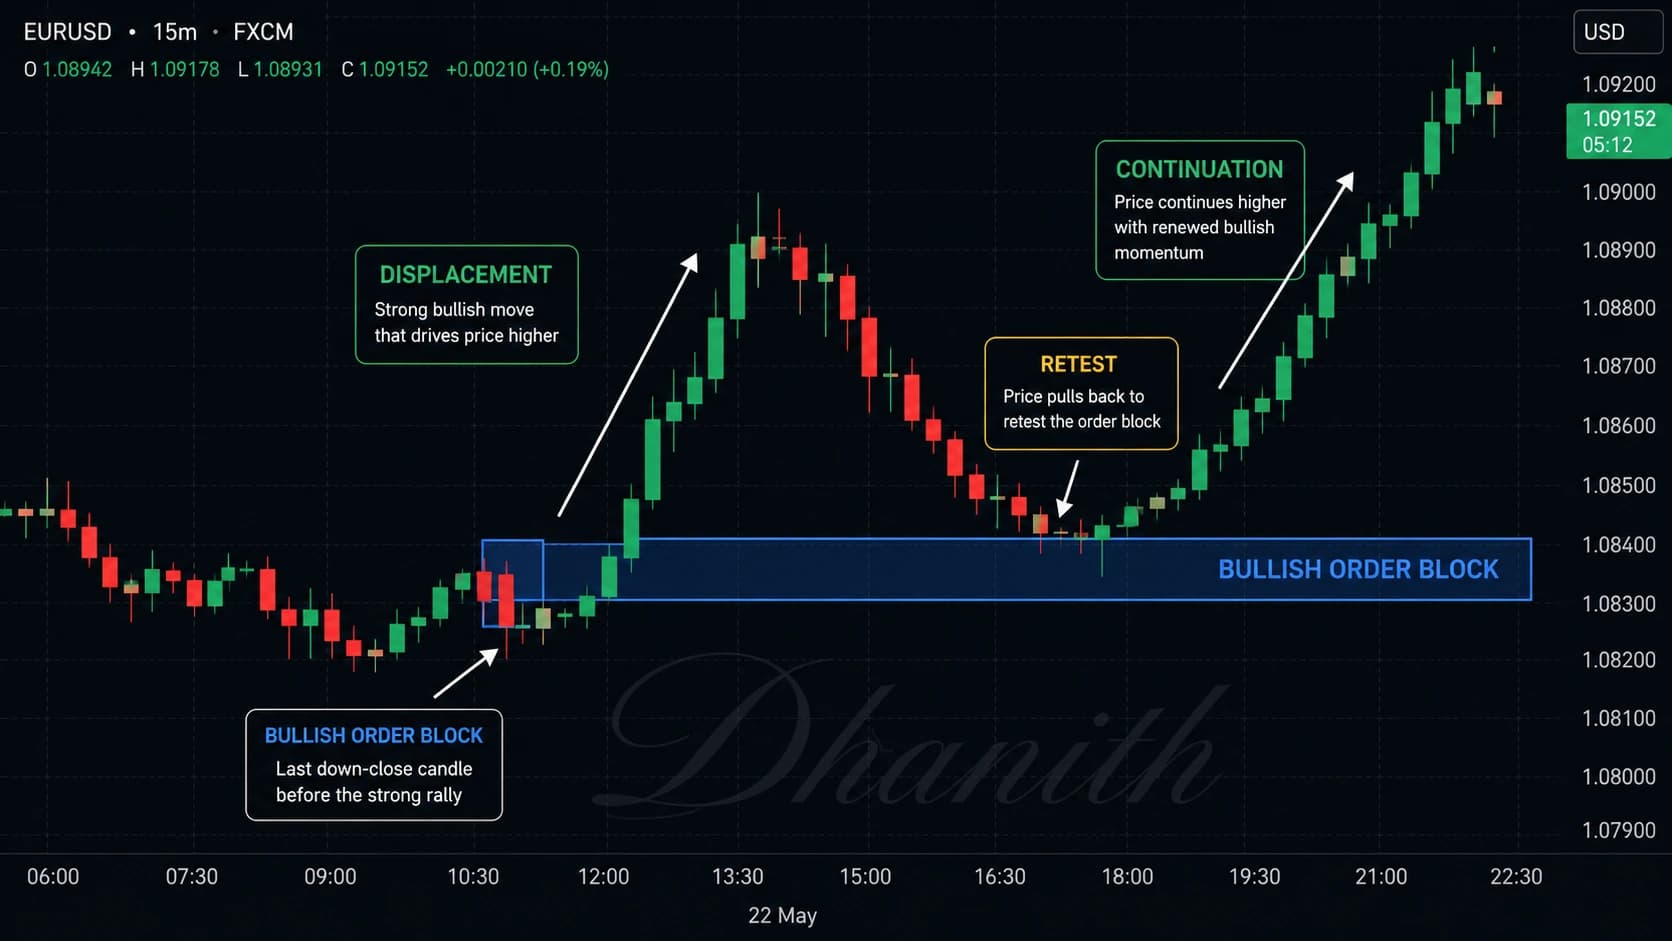
Bullish Order Block
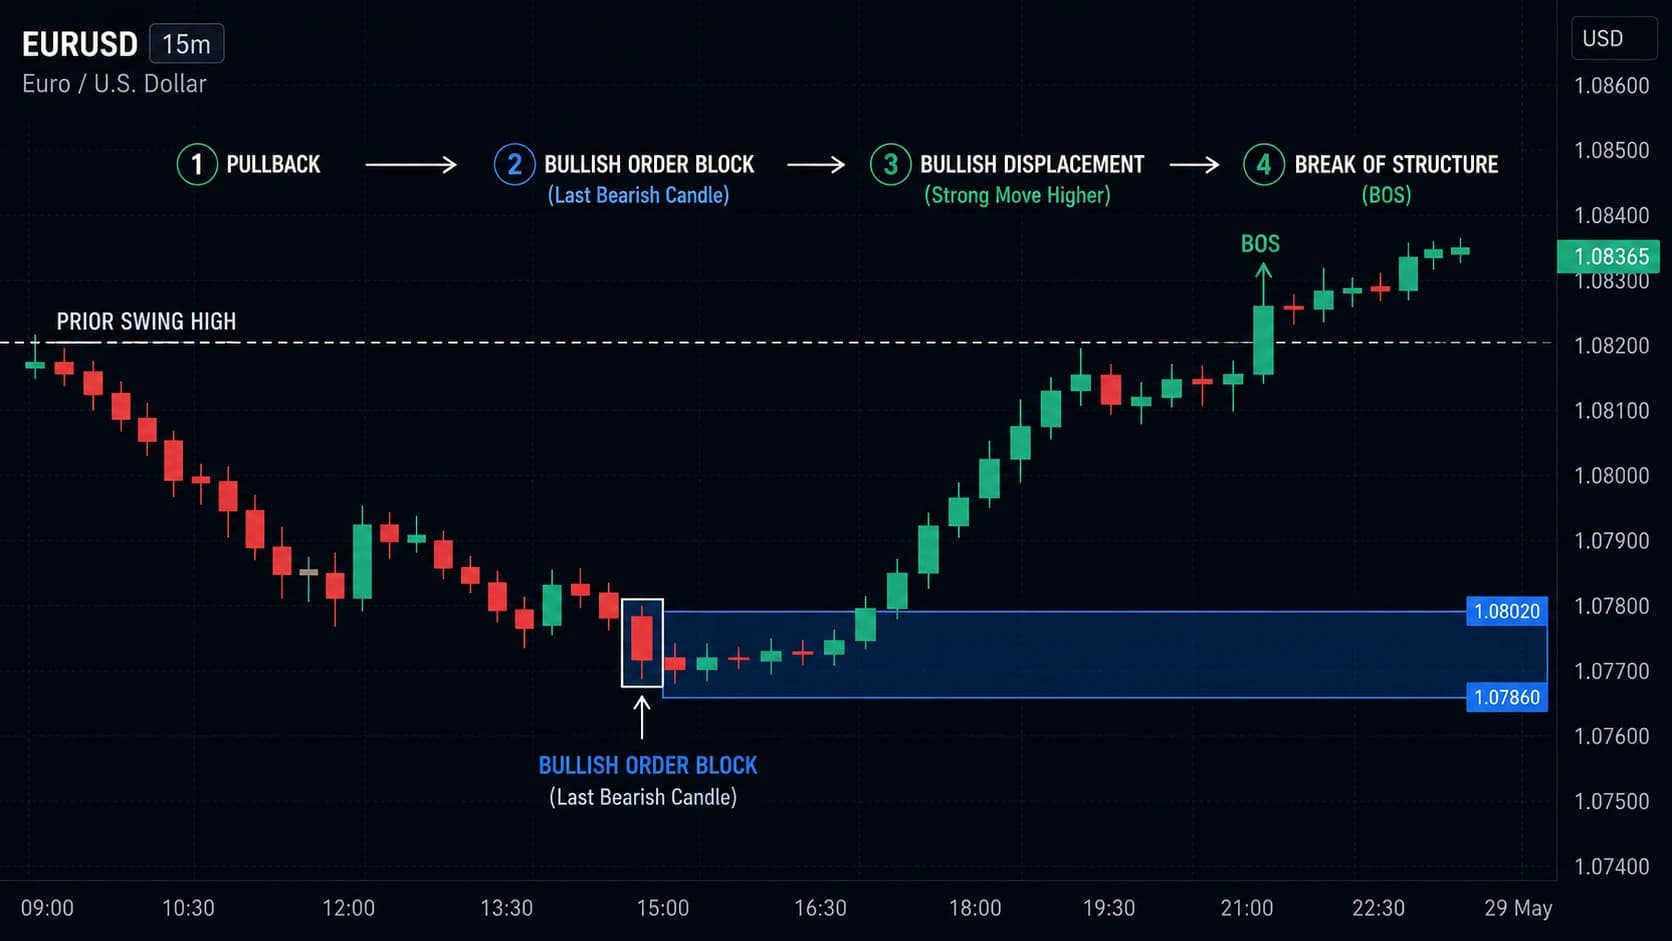
The bullish order block is the most commonly traded OB setup and the foundation of long entries in an SMC bullish trend.
Formation sequence:
- Price is in a downward move or pullback
- The last bearish candle forms — this will become the bullish OB
- Price reverses aggressively upward from that candle (displacement)
- The upward impulse breaks a prior swing high (BOS)
- The zone of the last bearish candle is now a confirmed bullish OB
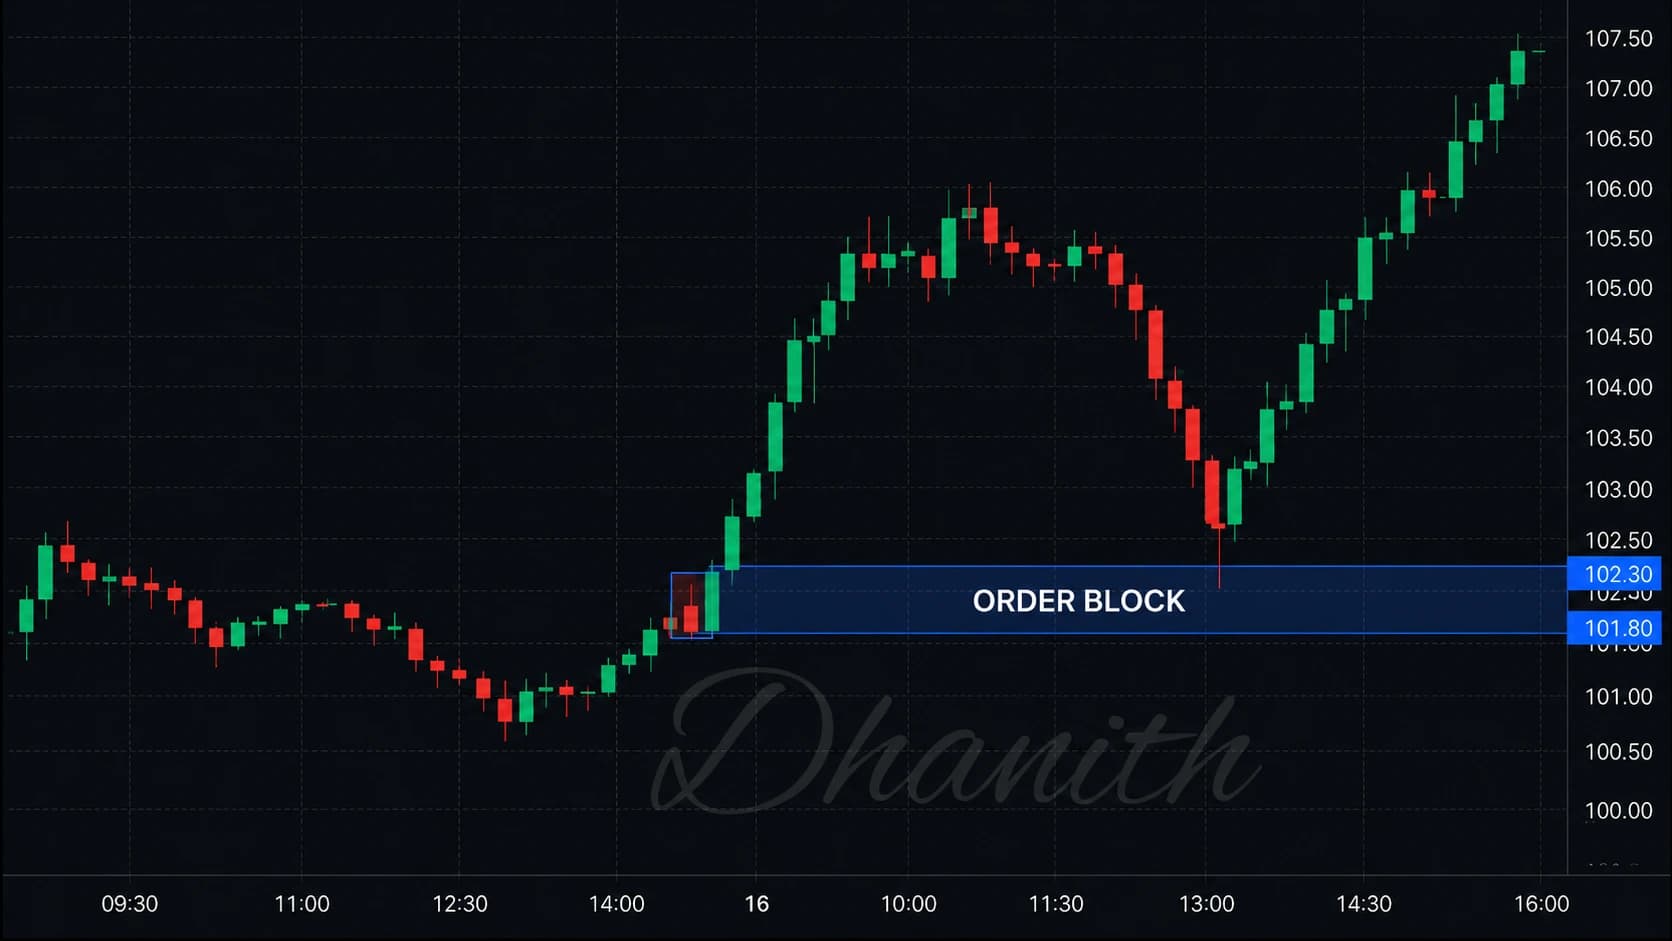
What the zone represents: The body of the final bearish candle (from open to close) is the primary OB zone. The full candle range (high to low, including wicks) is the extended zone. The 50% midpoint of the candle body is the optimal entry level.
When price returns to a bullish OB:
- Price retraces downward after the bullish BOS move
- As it enters the OB zone, institutional buy orders defend the level
- A bullish price reaction follows — the entry trigger
Bearish Order Block
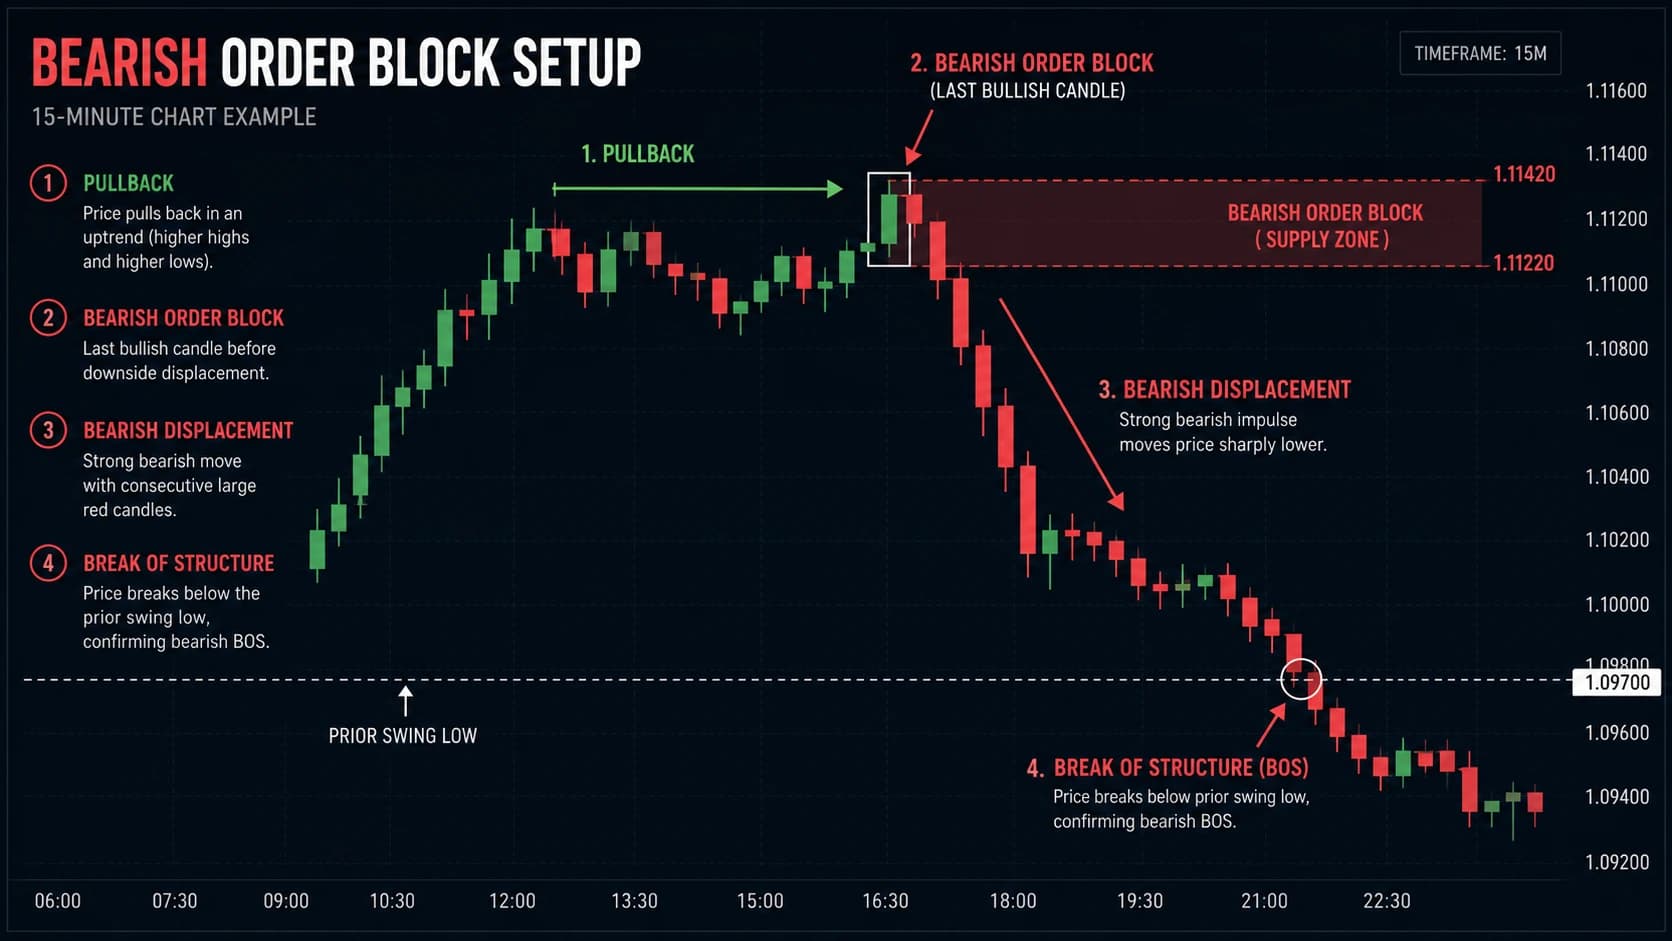
The bearish order block is the mirror: the last bullish candle before a bearish displacement move that breaks a prior swing low.
Formation sequence:
- Price is in an upward move or rally
- The last bullish candle forms — this will become the bearish OB
- Price reverses aggressively downward (displacement)
- The downward impulse breaks a prior swing low (BOS)
- The zone of the last bullish candle is a confirmed bearish OB
When price returns to a bearish OB:
- Price rallies back into the OB zone after the bearish BOS move
- Institutional sell orders defend the level
- A bearish price reaction follows — the short entry trigger
Pro Tip: There is an intentional visual deception built into order blocks. A bullish OB looks bearish — it's a red/down candle. A bearish OB looks bullish — it's a green/up candle. This is by institutional design. The OB candle is the last moment the market appeared to be going in one direction before institutions revealed their true intent. Retail traders who see a bearish candle assume more selling; institutions were buying against that bearish appearance.
Breaker Block — The Failed OB That Flips
A breaker block is a former order block that has been invalidated by price — broken through entirely — and has now flipped polarity, acting as the opposite type of zone.
How a bullish breaker block forms:
- A bearish OB is confirmed (last bullish candle before bearish BOS)
- Price eventually breaks above that bearish OB — invalidating it as a resistance zone
- The invalidated bearish OB becomes a bullish breaker block — now acting as support
- When price retraces back into the former bearish OB zone, it now finds buying interest rather than selling pressure
How a bearish breaker block forms:
- A bullish OB is confirmed (last bearish candle before bullish BOS)
- Price eventually breaks below that bullish OB — invalidating it
- The former bullish OB becomes a bearish breaker block — now acting as resistance
- When price rallies back into the former bullish OB zone, it meets institutional selling
Why breaker blocks work: When a zone flips, it represents a location where previously trapped institutional positions are being unwound. The institutions that originally bought at the bullish OB are now stopping out (as price breaks below). Those stop-loss exits become fuel for the new bearish move. The breaker zone absorbs this unwinding and creates reliable reactions in the new direction.
Critical distinction — Breaker vs. Mitigation Block: A breaker block requires a liquidity sweep before the structure break. If no liquidity was swept prior to the OB being broken, the zone is a mitigation block, not a breaker. Breakers carry higher probability because the liquidity sweep confirms institutional involvement in the reversal.
Mitigation Block — The Second Visit
A mitigation block is a previously identified OB that price has already visited once and reacted to — but not fully exhausted. When price returns to the same zone a second time, it is trading the "mitigation" of remaining institutional orders.
The mechanism: When institutions placed their original orders at an OB, they may not have filled the entire desired position on the first touch. The remaining unfilled orders sit at the same zone. When price returns for a second visit, the institution fills those remaining orders — causing another price reaction.
Key difference from a fresh OB: A mitigation block is an OB that has been tested once already. The first touch consumed a portion of the institutional orders. The second touch — the mitigation — still produces a reaction, but typically a less aggressive one than the first visit. Third and subsequent touches carry diminishing probability as the institutional orders are gradually consumed.
Trading mitigation blocks: The entry logic is identical to a fresh OB — enter at the 50% level of the zone, stop beyond the wick, target the next liquidity pool. But reduce your position size slightly relative to a fresh, unmitigated OB, reflecting the lower institutional interest remaining.
Rejection Block — The Extended Wick Zone
A rejection block forms when price creates a candle with a very long wick — a clear rejection — at a significant level. The wick itself becomes the zone.
Unlike a standard OB, which is defined by the candle body, a rejection block's zone is defined by the wick extension. The wick represents aggressive institutional activity — a push into a price area followed by immediate, strong rejection.
Identifying rejection blocks:
- A candle with a wick at least twice the length of the body
- Appears at a meaningful structural level (swing high, swing low, prior OB, round number)
- The wick was created by a rapid spike and immediate reversal — not a slow drift
Trading rejection blocks: They function similarly to OBs but are often used as supplementary confirmation rather than primary entry zones. When a rejection block wick overlaps with a standard OB or FVG, the confluence significantly strengthens the zone.
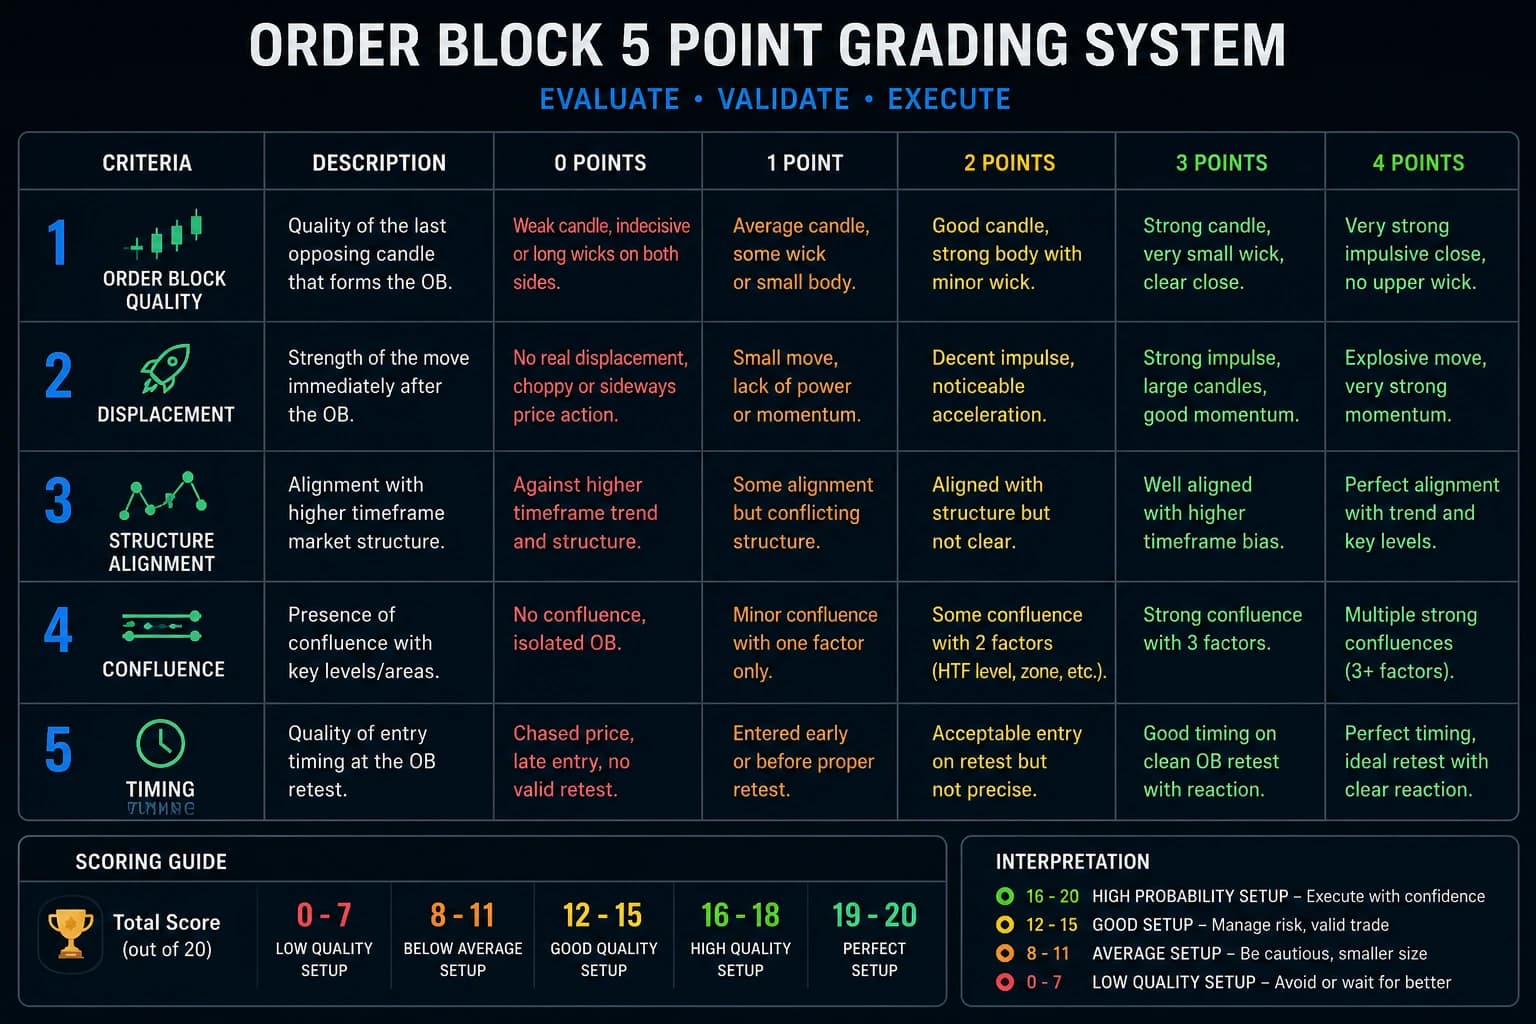
Part 4: The 5-Point OB Grading System — Ranking Setup Quality
Not all valid OBs are worth trading. A bullish OB in a bearish daily trend, at a premium zone, after being tested twice, with no volume confirmation, is a technically valid OB with very low probability. A fresh, unmitigated bullish OB at a discount zone, aligned with the daily trend, with a FVG overlap and a prior liquidity sweep — that is a Grade A setup.
The 5-point grading system allows you to objectively assess any OB before committing capital.
The 5 Grading Criteria
Criterion 1 — Higher Timeframe Alignment (0–2 points)
| Alignment | Score |
|---|---|
| OB direction matches both daily AND 4H structure | 2 points |
| OB direction matches daily structure only | 1 point |
| OB fights the daily structure (counter-trend) | 0 points |
This is the most important criterion. An OB that aligns with the daily structure automatically has institutional momentum behind it. An OB that fights the daily trend is swimming upstream against institutional flow. No other criterion compensates for this one being zero.
Criterion 2 — Mitigation Status (0–2 points)
| Status | Score |
|---|---|
| Unmitigated — price has never returned to this OB | 2 points |
| Mitigated once — first touch produced a reaction, second visit | 1 point |
| Mitigated twice or more | 0 points |
First-touch OBs carry maximum institutional interest — all of the original orders are still unfilled. Each subsequent visit consumes a portion of those orders, reducing the zone's effectiveness. An OB visited three or more times should be removed from your chart — it has been exhausted.
Criterion 3 — FVG Confluence (0–1 point)
| FVG Status | Score |
|---|---|
| A Fair Value Gap overlaps with the OB zone | 1 point |
| No FVG at the OB zone | 0 points |
When the OB and an FVG occupy the same price area, you have both institutional entry interest (OB) and a price imbalance that the market must return to fill (FVG). This is the highest-probability configuration in SMC. The FVG adds a mechanical reason for price to return to the zone beyond the institutional order thesis.
Criterion 4 — Liquidity Sweep Before OB (0–1 point)
| Sweep Status | Score |
|---|---|
| A liquidity sweep occurred before price entered the OB zone | 1 point |
| No liquidity sweep before entry into the OB | 0 points |
A liquidity sweep before price reaches the OB confirms institutional involvement in the move toward the zone. Smart money drove price below obvious stop levels, collected that liquidity, and is now delivering price to the OB to absorb its own orders. This sequence — sweep then OB reaction — is one of the cleanest institutional patterns in trading.
Criterion 5 — Premium/Discount Position (0–1 point)
| Zone Position | Score |
|---|---|
| Bullish OB in discount zone (below 50% of current range) | 1 point |
| Bearish OB in premium zone (above 50% of current range) | 1 point |
| OB in the wrong premium/discount zone | 0 points |
Institutions buy in discount and sell in premium — always. A bullish OB sitting above the 50% equilibrium of the current swing range is technically valid but positionally wrong. Understanding premium and discount zones is essential for correctly positioning every OB entry. Draw a Fibonacci tool over the current swing range. Verify your OB is in the correct half of the range before proceeding.
The Grading Scale
| Score | Grade | Action |
|---|---|---|
| 7 points | Grade A+ | Maximum position size — highest conviction |
| 5–6 points | Grade A | Full position size |
| 3–4 points | Grade B | Reduced position size (50–75%) |
| 1–2 points | Grade C | Skip — too many strikes against it |
| 0 points | Invalid | Do not trade |
Pro Tip: Before touching any OB entry, run the 5-point checklist in writing. Not in your head — on paper or in your trading journal. Traders who execute this checklist consistently report fewer impulsive entries and significantly better average trade quality within 30 days of implementing it.
Part 5: The Data — Do Order Blocks Actually Work?
Before committing a methodology to real capital, you need to know what the data says.
An analysis of over 2,400 OB setups across SPY, QQQ, and BTC from 2022–2024 revealed a critically important finding:
Standalone OBs (no structure confirmation) produced a 52% win rate. Barely above random. This explains why so many traders try OBs, get mediocre results, and conclude "SMC doesn't work."
OBs combined with BOS or CHoCH confirmation produced a 65–68% win rate. A substantial and tradeable edge, provided risk management is applied.
What does this tell us? Order blocks are not magic zones. They are institutional footprints that produce reliable reactions when combined with structural context. The structure (BOS confirming the OB, daily trend aligned) is what transforms a 52% outcome into a genuine 65–68% edge.
The additional grading factors — FVG confluence, liquidity sweep before entry, unmitigated status, premium/discount positioning — push high-grade setups toward the upper end of that range and beyond.
The takeaway: trade fewer OBs, grade them rigorously, demand structural alignment, and use risk management. The 65–68% win rate with 2:1 minimum risk-reward creates a mathematically positive expectancy system.
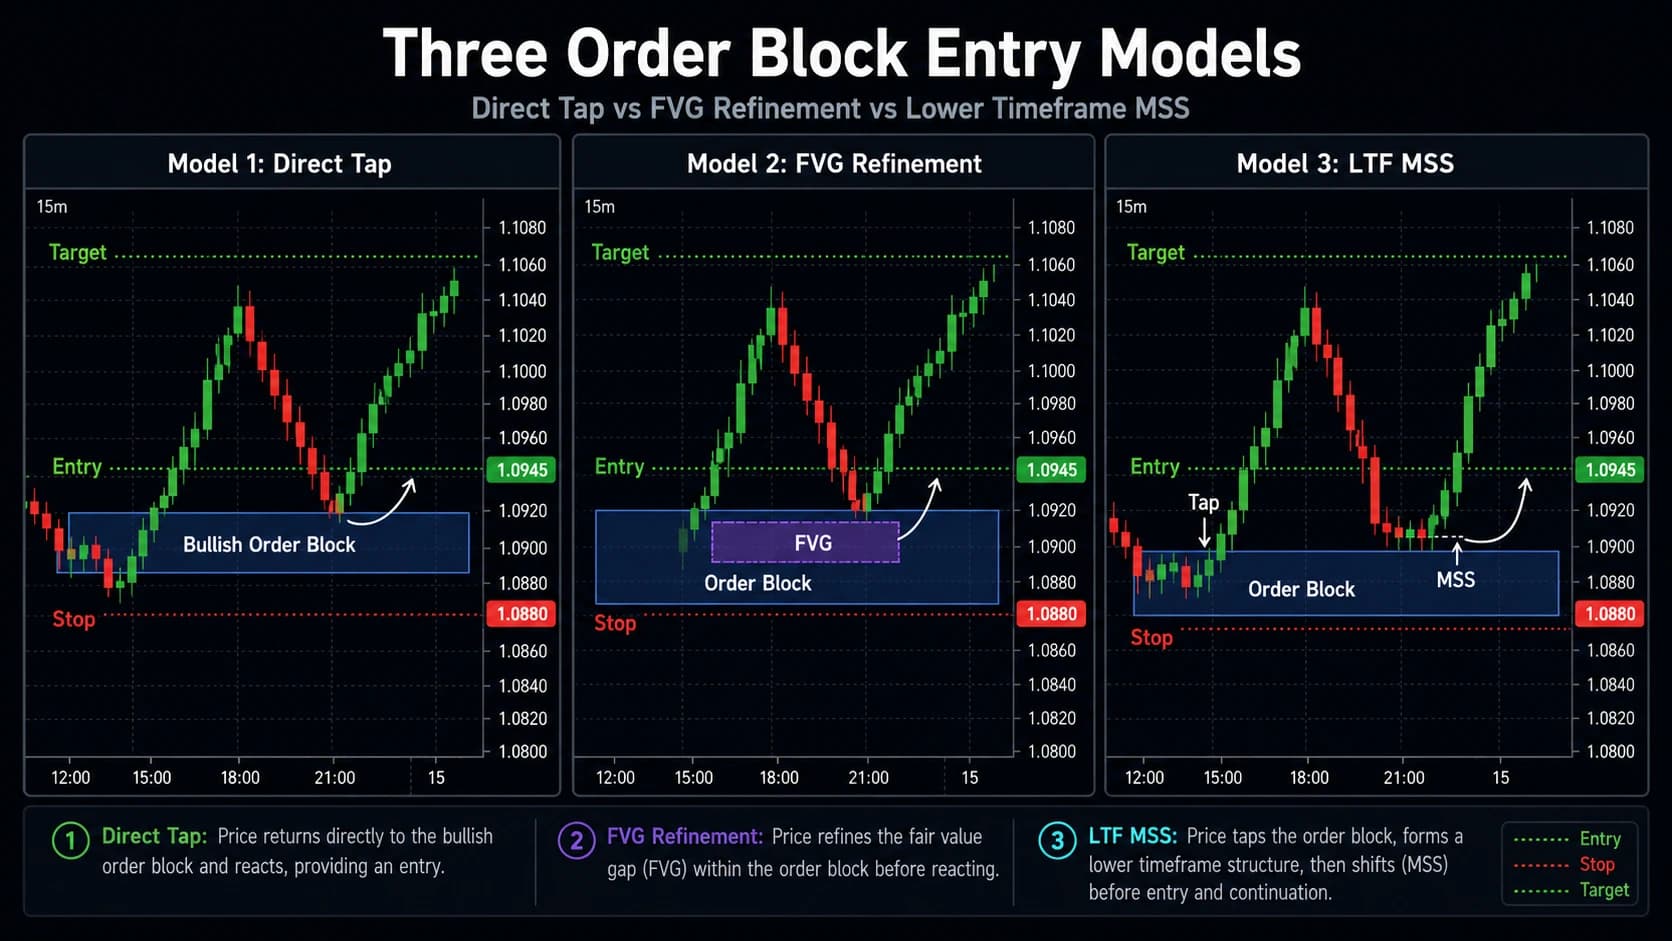
Part 6: Three Entry Models — Matched to Your Risk Tolerance
There are three distinct ways to enter an order block trade. Each carries different risk, different reward, and suits different trader personalities. Understanding all three allows you to choose the one that matches your style — and potentially use all three in different market conditions.
Entry Model 1 — The Direct OB Tap (Aggressive)
What it is: A limit order placed at the 50% midpoint of the OB candle body, triggered the moment price returns to the zone. No lower timeframe confirmation required.
Entry mechanics:
- Mark the OB candle high and low
- Place a limit buy (bullish OB) or limit sell (bearish OB) at the 50% level of the OB body
- Set stop loss below the OB wick low (bullish) or above the OB wick high (bearish) with a small buffer
- Set take profit at the next significant liquidity pool
Advantages:
- Tightest stop loss — entering at the midpoint of the zone gives maximum distance from the wick while keeping risk small
- Best risk-reward ratio — tight stop means bigger R multiples
- No missed entries — the order fills automatically when price touches the zone
Disadvantages:
- No lower timeframe confirmation — the OB might be swept and invalidated before reacting
- Requires higher-quality OBs to compensate for lack of confirmation — Grade A or A+ only
Best suited for: Traders comfortable with aggressive entries who have deeply internalized market structure and can identify only the highest-grade OBs. Not recommended for traders still developing their OB identification skills.
Entry Model 2 — The FVG Refinement Entry (Intermediate)
What it is: Rather than entering at the OB midpoint, you wait for price to enter the OB zone and then look for a Fair Value Gap that formed within the impulse that created the OB. Entry is placed at the FVG's midpoint inside the OB zone.
Entry mechanics:
- Confirm the OB meets all three validity conditions
- Identify any FVG that formed within the impulse move away from the OB (between the OB and the first subsequent swing high/low)
- When price retraces into the OB zone and enters the FVG, place the entry at the FVG midpoint
- Stop below the OB wick (bullish) or above the OB wick (bearish)
- Target the next liquidity pool
Advantages:
- OB + FVG confluence provides the highest-probability zone in SMC
- The FVG provides a mechanical "magnet" — price is drawn to fill it, giving structural reason for the entry zone beyond just the OB
Disadvantages:
- Not every OB has an overlapping FVG — this entry model applies only to OBs where FVG confluence exists
- Slightly less aggressive entry than Model 1 — entry price may be slightly worse
Best suited for: Intermediate traders who want confirmation beyond the OB alone. This is the recommended default entry model for most situations.
Entry Model 3 — The Lower Timeframe MSS Confirmation (Conservative)
What it is: After price enters the OB zone, you drop to a lower timeframe (15-minute or 5-minute) and wait for a Market Structure Shift (MSS) or Change of Character (CHoCH) before entering. The lower timeframe structural shift is your trigger.
Entry mechanics:
- Confirm the OB meets all three validity conditions (higher timeframe)
- Watch price enter the OB zone on the entry timeframe (1-hour or 4-hour)
- Drop to the 15-minute or 5-minute chart
- Wait for a bearish-to-bullish CHoCH or MSS on the lower timeframe inside the OB zone (for long trades)
- Enter after the confirmation candle closes — market order or aggressive limit at the confirmation level
- Stop below the lowest point price reached within the OB zone
- Target the next liquidity pool on the higher timeframe
Advantages:
- Highest conviction entries — two independent confirmations (HTF OB + LTF MSS)
- Lowest percentage of false entries — the LTF MSS filters out OBs that are swept rather than respecting
- Most consistent with risk management — you only enter when price has demonstrably reversed at the zone
Disadvantages:
- Wider stop loss — lower R multiple
- Some trades will miss entirely if price reacts immediately without an LTF MSS forming
- Requires monitoring the chart actively — limit orders can't be set in advance
Best suited for: Traders who prioritize certainty over position efficiency. Excellent for traders still building confidence in OB identification — the LTF MSS requirement acts as a safety net against entering too early.
Which Entry Model Should You Use?
| Your Profile | Recommended Model |
|---|---|
| Aggressive, high-conviction analysis, Grade A OBs only | Model 1 — Direct OB Tap |
| Intermediate, wants OB + FVG confluence | Model 2 — FVG Refinement |
| Conservative, prefers highest certainty | Model 3 — LTF MSS Confirmation |
| Building skills, not yet consistent | Model 3 — LTF MSS Confirmation |
Part 7: Stop Loss and Target Placement — The Complete Rules
Stop Loss Placement
The universal rule: stop loss goes beyond the OB wick, never inside the body.
For a bullish OB: The stop goes below the lowest wick of the OB candle, plus a 0.1–0.2% buffer (for stocks). The wick represents the absolute extreme of the OB zone. If price closes below the wick, the institutional thesis is invalidated — the OB has been broken and price is not respecting the institutional zone.
For a bearish OB: The stop goes above the highest wick of the OB candle, plus a small buffer.
Why not inside the body? The 50% midpoint of the body is often used as an entry level. If the stop is placed at the bottom of the body for a bullish OB, a wick into the lower half of the body will trigger the stop — but the OB is still valid (the wick hasn't been broken). You'd be stopped out of a technically intact setup.
The buffer: Add a small buffer beyond the wick to account for wicks that momentarily extend beyond the OB before reversing. A buffer of 0.1–0.2% of the stock price is appropriate for daily chart OBs. This prevents stops from being triggered by the liquidity sweeps that often occur at OB zones before the real reversal begins.
Warning: Do not widen your stop because the trade "feels" like it should work. If you need to widen the stop beyond the OB wick to make the trade viable, that's a signal the setup is low quality — not that your stop is too tight. Accept the defined risk or skip the trade.
Target Placement
Primary target: The next significant liquidity pool in the direction of the trade.
For bullish OBs: Target the nearest buy-side liquidity — the most recent swing high, equal highs, or prior all-time high above current price.
For bearish OBs: Target the nearest sell-side liquidity — the most recent swing low, equal lows, or prior all-time low below current price.
Minimum risk-reward: 2:1. If the distance from entry to stop is $2 per share and the distance from entry to target is less than $4 per share, the setup does not meet the minimum quality threshold. Skip it.
Scaling out: For Grade A+ setups, consider taking partial profits at 1:1 (covering the risk) and moving the stop to breakeven. Let the remaining position run to the full target or trail it behind structural swing lows. This approach guarantees the trade is risk-free after the first partial exit while preserving upside on strong moves.
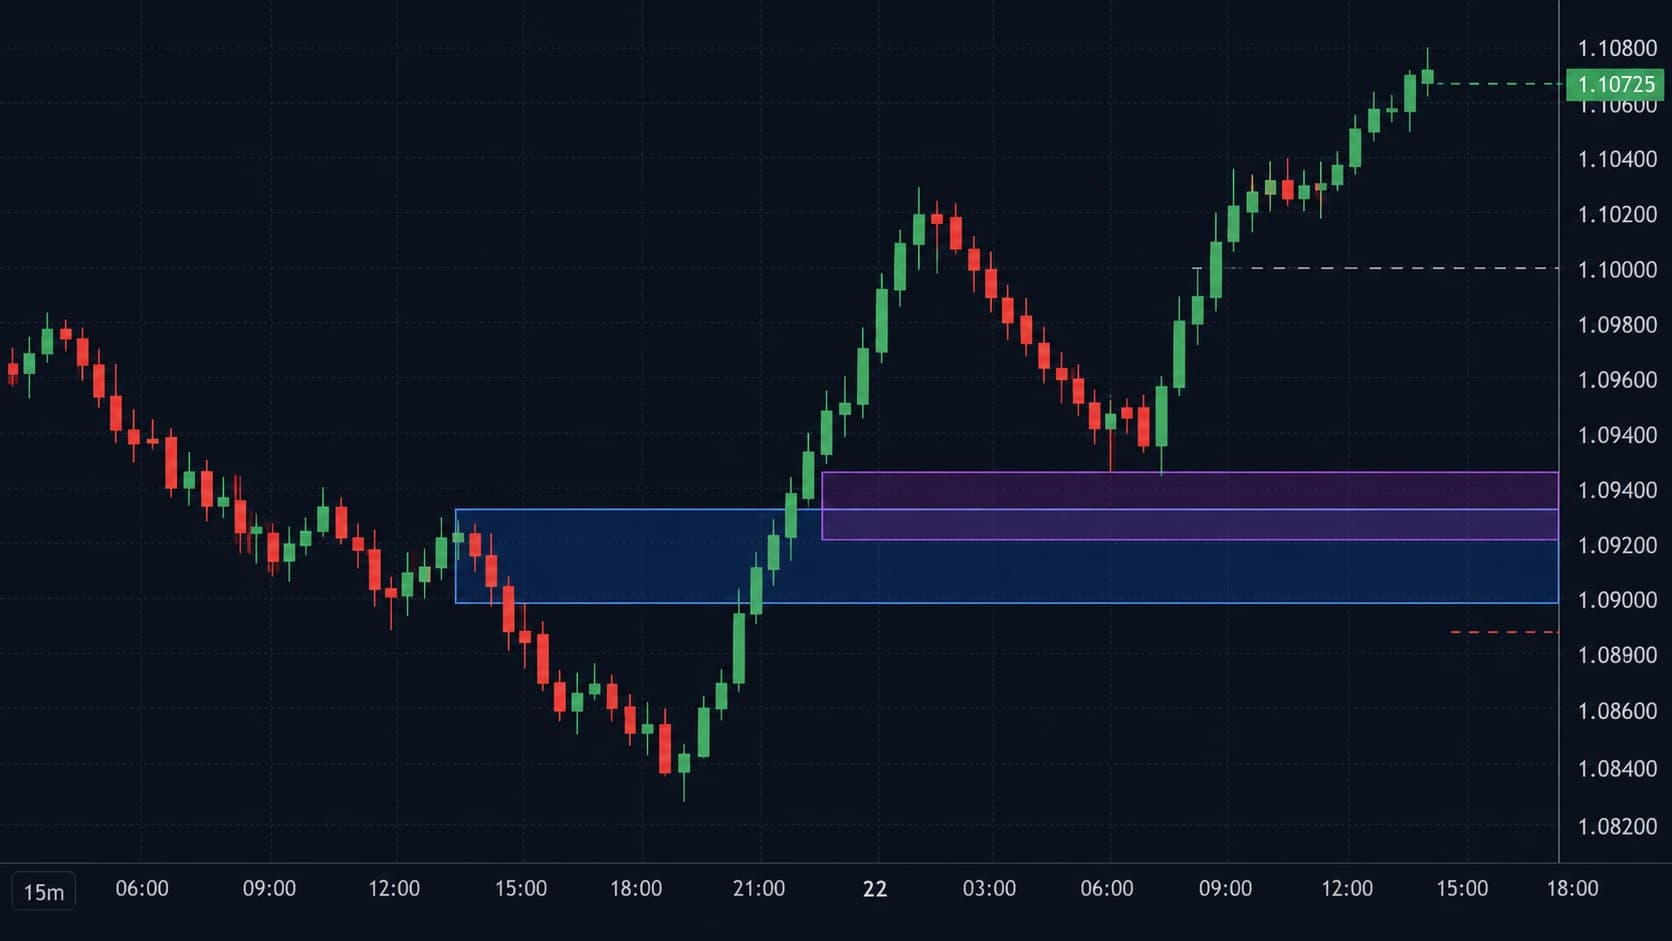
Part 8: OB + FVG Confluence — The Highest-Probability Configuration
The most consistently profitable order block setup in SMC is not a standalone OB. It is an OB that overlaps with a Fair Value Gap.
Why the Confluence Is Powerful
When an institution makes an aggressive order block move, they often do so with such speed and conviction that they skip over price levels entirely — creating a Fair Value Gap (three-candle imbalance where candle 1's wick and candle 3's wick don't overlap). The FVG sits inside the impulse leg that originated from the OB.
When price retraces toward the OB, it simultaneously approaches the FVG within that same price area. Two independent mechanisms are now pulling price to the same zone:
- The OB — institutional orders are resting here, waiting to be filled
- The FVG — price was delivered inefficiently here, and the market's price discovery mechanism will eventually fill the gap
This is not one reason to enter — it is two separate, independently valid reasons pointing to the same location. That is confluence. And confluence is how retail traders build genuine, sustainable edges.
How to Identify the OB + FVG Overlap
Step 1: Confirm the OB meets all three validity conditions on your entry timeframe (4-hour or daily).
Step 2: Identify any FVGs within the impulse move that originated from the OB. Look at the three-candle sequence starting from the OB candle — do any three consecutive candles create a non-overlapping gap?
Step 3: Check if the FVG zone and the OB zone overlap — share the same price area, even partially.
Step 4: If they overlap, mark the overlapping zone as your primary entry area. This is your highest-confidence entry level.
Step 5: Place your entry at the midpoint of the overlapping zone. Stop beyond the OB wick. Target the next liquidity pool.
The OB + FVG + Liquidity Sweep Trifecta
The most complete order block setup possible combines all three elements:
- A liquidity sweep occurs first — price spikes below a recent swing low (for bullish setups), collecting sell-side liquidity
- Price rebounds into the OB zone — which overlaps with an FVG
- A lower timeframe MSS confirms buyers are stepping in at the zone
When all three align — liquidity sweep, OB + FVG confluence, and LTF confirmation — you have a 7-point Grade A+ setup. These are the setups that produce 3:1, 4:1, and occasionally 5:1+ risk-reward outcomes. They don't appear daily. When they do, they deserve maximum position sizing within your risk management framework.
Part 9: Multi-Timeframe Order Block Analysis
Order blocks exist on every timeframe — from the weekly chart down to the 1-minute. But not all OBs carry equal weight. Higher timeframe OBs represent larger institutional orders and produce stronger reactions.
The Timeframe Hierarchy for Stocks
| Timeframe | OB Significance | Use Case |
|---|---|---|
| Weekly | Strongest — major institutional zones | Macro context, long-swing targets |
| Daily | High — primary trade direction OBs | Setup identification |
| 4-Hour | Medium-high — refined entry zones | Entry zone confirmation |
| 1-Hour | Medium — intraday structure | Entry timing |
| 15-Minute | Lower — entry precision | Entry trigger on LTF MSS |
| 5-Minute | Low — execution only | Fine-tuning limit order placement |
The Top-Down OB Process
Step 1 — Weekly and Daily context: Are there any significant unmitigated OBs on the weekly or daily chart nearby? These are the most important zones on the chart — price is magnetically drawn to these levels before continuing or reversing.
Step 2 — Daily OB identification: Mark all unmitigated OBs on the daily chart that align with the current daily trend direction. These are your primary candidate trade setups.
Step 3 — 4-Hour refinement: For each valid daily OB, check the 4-hour chart for a more refined OB within the same price area. A 4-hour OB within a daily OB zone creates a stacked confluence — multiple timeframe institutional interest at the same price level.
Step 4 — Entry execution: On the 15-minute chart, watch for the entry trigger (LTF MSS or direct OB tap depending on your model) as price enters the daily/4H OB zone.
Stacked Multi-Timeframe OBs
When a daily OB and a 4-hour OB occupy the same price area, you have a stacked OB — one of the most reliable setups in institutional trading.
The logic: if both the daily chart institutions and the 4-hour chart institutions placed orders at the same price level, the concentration of institutional interest at that zone is amplified. Price reactions at stacked OBs are typically sharper and more sustained than single-timeframe OB reactions.
When you find a stacked OB, add 1–2 extra points to your grading score and consider it a higher-priority setup than a single-timeframe OB, even if other criteria are identical.
Part 10: Order Blocks in the Full SMC Trade Framework
An order block is not a standalone trade system — it is the entry mechanism within the broader SMC framework. Understanding where it fits in the complete institutional flow makes it dramatically more powerful.
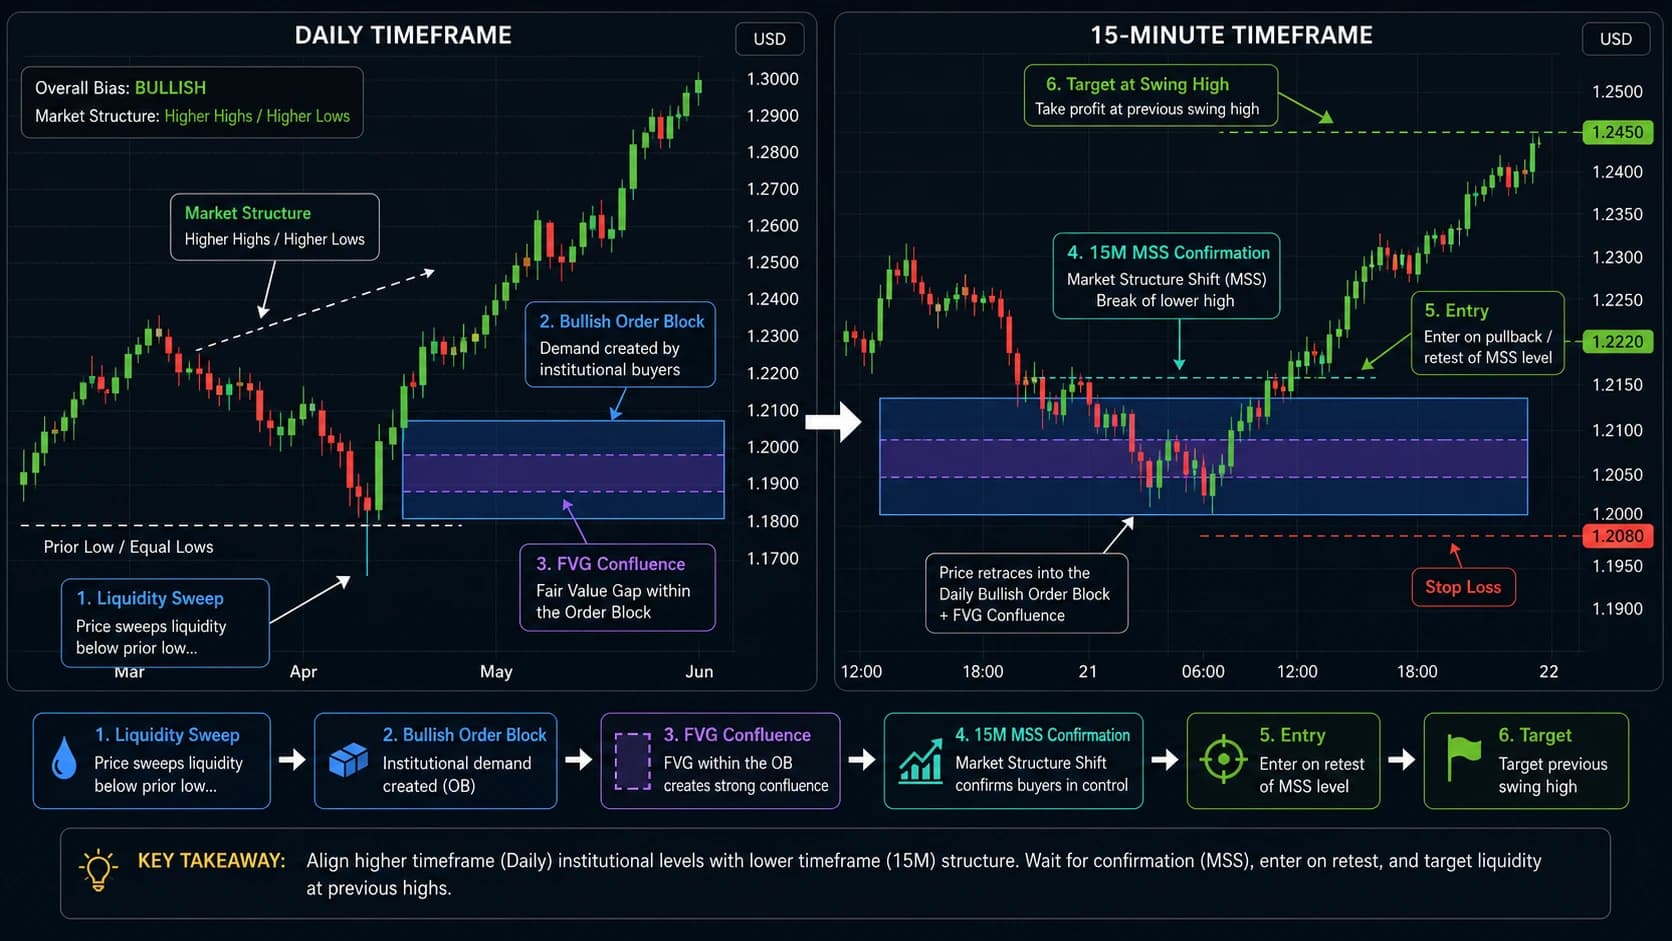
The Complete SMC Trade Sequence
Phase 1 — Accumulation (Structure building): Institutions quietly build positions within a range. Price moves sideways — tight, overlapping candles. The OB that will ultimately drive the next trend leg is forming here, during this range, as institutions absorb the retail selling against them.
Phase 2 — Manipulation (Liquidity collection): Before the real move, institutions engineer a false breakout in the opposite direction. Price sweeps the most obvious retail stop levels — the equal lows below the range (for bullish setups) or equal highs above the range (for bearish setups). The OB that is about to become active is just above this sweep.
Phase 3 — Distribution (The real move): After collecting liquidity, institutions push price impulsively in their intended direction. This displacement move creates the OB (the last opposing candle at the bottom of the move), leaves Fair Value Gaps, and breaks structure. The OB is now confirmed.
Phase 4 — Retracement to OB (Your entry): Price retraces after the initial BOS move. It moves back toward the OB zone — sometimes sweeping a minor internal liquidity level on the way. As it enters the OB, institutional orders defend the level. A lower timeframe MSS confirms the reversal. You enter.
Phase 5 — Continuation (Trade management): After OB entry, price continues in the trend direction, targeting the next liquidity pool. You manage the trade per your predetermined plan — partial exit at 1:1, stop to breakeven, final exit at target.
This five-phase sequence is the institutional AMD (Accumulation, Manipulation, Distribution) cycle — and the OB is the precise entry point at the end of Phase 3, at the beginning of Phase 4.
Part 11: The Most Common Order Block Mistakes and How to Fix Them
Mistake 1 — Marking Invalid OBs Without Running the Checklist
This is the most widespread error. Traders see a large move and mark any nearby candle as the OB — without verifying the last opposing candle, displacement, and BOS conditions.
The fix: Create a literal checklist on paper or in your trading app:
- Is this the LAST opposing candle before the impulse?
- Was the departure displacement (large, aggressive candles)?
- Did the impulse cause a BOS of a meaningful swing point?
- What is this OB's grade on the 5-point system?
Run this checklist before marking any OB. If any box remains unchecked, the OB is invalid — do not mark it.
Mistake 2 — Trading OBs Against the Daily Trend
A beautiful 15-minute bullish OB inside a bearish daily trend. It looks perfect. The zone is clean, the FVG is there, the liquidity sweep just happened. And it still loses.
Why: The daily bearish structure means institutions are distributing — net sellers. Any bullish OB on the 15-minute is counter-institutional. The daily sellers will eventually overwhelm the 15-minute buyers. This is the trade that works 3 times in a row and then produces a massive loss on the 4th that erases all previous gains.
The fix: Before marking any OB on any timeframe, establish the daily chart trend. Only trade OBs in the direction of the daily structure. No exceptions.
Mistake 3 — Placing the Stop Inside the OB Body
Stop at the OB body's 25% level instead of beyond the wick. The inevitable wick into the lower half of the OB triggers the stop — then price bounces exactly as expected.
The fix: Stop loss always goes beyond the wick. No exceptions. The wick is the zone's outer boundary. If price closes beyond the wick, the OB is invalidated. If price only wicks beyond and recovers, the OB is still intact — and your stop, placed beyond the wick with a buffer, should survive the test.
Mistake 4 — Trading Mitigated OBs as Fresh Zones
Treating an OB that has already been visited once as if it has the same probability as an unmitigated zone. The institutional orders were partially consumed on the first visit — the second touch has less fuel behind it.
The fix: Mark OBs as "mitigated" after the first touch produces a reaction. Reduce position size on second touches. Delete the zone after three touches — it no longer has meaningful institutional interest.
Mistake 5 — Entering at the OB Without Waiting for the Zone to Be Reached
Entering early because "price is getting close" to the OB zone. A stock is $2 above the OB — the trader goes long because the OB "should hold."
The fix: Do not enter until price actually reaches the OB zone. "Getting close" is not an entry signal. Let price come to you. If it never reaches the zone and rallies away — there will be another setup tomorrow. Chasing entries outside the zone converts a well-defined risk trade into a random hope trade.
Mistake 6 — Ignoring Volume at the OB Reaction Candle
On stocks (unlike forex), volume is visible and provides critical confirmation. A bullish reaction candle at an OB on above-average volume — institutions are buying. The same reaction candle on thin volume — retail noise, institutional conviction is absent.
The fix: On the reaction at the OB zone, check volume. If the reaction candle is on significantly above-average volume (1.5x or more the 20-period average), treat the reaction as institutionally confirmed. Below-average volume on the reaction candle means wait — look for a second confirmation or skip the setup entirely.
Mistake 7 — Not Managing the Trade After Entry
Entering at a Grade A OB and then doing nothing — no partial exit at 1:1, no stop adjustment, no target management. The trade hits 1.5R profit then reverses to a 1R loss when it could have been a breakeven trade or a partial profit.
The fix: Define your complete trade management plan before entry. At what point do you take partial profits? When do you move to breakeven? What is the final target? Write these levels down before pressing the entry button. Reactive trade management — decisions made while in a trade — is emotionally driven and consistently suboptimal.
Part 12: Building an Order Block Trading Routine
Knowledge without structure produces inconsistency. Here is the daily routine that turns order block theory into a systematic, repeatable practice for stock traders.
Pre-Market Analysis (7:00–9:00 AM ET)
Weekly and Daily chart review (15 minutes): Open each stock on your watchlist. Mark any unmitigated daily OBs that are within 3–5% of the current price. Grade each one using the 5-point system. Stocks with Grade A OBs within reach are your primary focus for the day.
Market context check (10 minutes): Review the S&P 500 (SPY) and NASDAQ (QQQ) daily charts. What is the index structure? Bullish, bearish, or ranging? Bullish OBs in individual stocks carry higher probability when the index is in bullish structure. Fighting the index structure dramatically reduces setup quality regardless of how clean the individual OB looks.
Watchlist finalization: Select 3–5 stocks where: (a) the daily trend is clear, (b) an unmitigated OB is within reach, and (c) the OB grade is A or higher. These are your focus stocks for the session.
Session Execution (9:30–11:00 AM ET)
9:30–10:00 AM — Watch and wait: The first 30 minutes often contains the manipulation phase of the daily AMD cycle. Do not enter in the first 15 minutes unless price has already reached your pre-identified OB zone and is showing a clear reaction. Let the open volatility settle.
10:00–11:00 AM — Primary entry window: This is when the highest-probability OB setups trigger. As price enters your pre-marked zones, switch to the 15-minute chart. Watch for the LTF MSS if using Model 3, or monitor the OB zone tap if using Model 1 or 2.
Trade execution discipline: Enter only setups on your pre-market watchlist. Do not identify new setups during the trading session — the emotional state of live trading is not the environment for rigorous OB identification. The pre-market analysis is your clearheaded framework; the session is execution only.
End-of-Session Review (4:30–5:00 PM ET)
Trade journal entry for every trade (taken or missed):
- The OB zone (price range)
- The grade (5-point score)
- Entry model used
- Entry price, stop price, target price
- Outcome
- What you would do differently
Chart markup for tomorrow: After each session, update your charts. Mark mitigated OBs as such. Remove OBs that have been tested three times. Add any new OBs that formed during the session. Your chart should always reflect current, live institutional zones — not historical ones that no longer carry weight.
FAQ
Q: What is an order block in SMC trading? An order block is the last opposite-colored candle before a strong impulsive move that breaks market structure. It represents a zone where institutions placed large orders before a directional move, and where remaining unfilled orders create a high-probability entry when price returns to the zone. All three conditions — last opposing candle, displacement, and BOS — must be met for a valid identification.
Q: How is an order block different from regular support and resistance? Traditional support and resistance identifies price levels where price has historically reversed — without explaining why. An order block provides the institutional reason: institutions placed large orders at that specific level. This explains why OBs tend to produce sharper, more reliable reactions than generic S/R levels. OBs also have a defined expiration (they become invalid once fully mitigated), whereas traditional S/R levels are considered permanently significant.
Q: Do order blocks work on stock charts? Yes. Order blocks apply to any liquid market with institutional participation — stocks, ETFs, indices, crypto, and futures. For US stocks, OBs work particularly well on the daily and 4-hour charts during the New York AM session. The same three conditions (last opposing candle, displacement, BOS) apply identically across all markets and timeframes.
Q: What is the win rate of order block trading? Analysis of 2,400+ setups across SPY, QQQ, and BTC showed standalone OBs without structure confirmation produce a 52% win rate — barely above random. When combined with BOS/CHoCH confirmation, win rate rises to 65–68%. Adding FVG confluence, liquidity sweep confirmation, and higher timeframe alignment pushes Grade A setups to the higher end of that range. Risk management at a minimum 2:1 R:R creates positive expectancy from those win rates.
Q: What is the difference between an order block and a breaker block? An order block is a zone where institutional orders caused a directional move — used for continuation trades in the direction of the original move. A breaker block is a former order block that price has invalidated by trading entirely through it — it then flips polarity and acts as the opposite type of zone. An OB that price breaks through becomes a breaker block trading in the new direction.
Q: How do I know when an order block is no longer valid? An order block is invalidated when price closes beyond the OB wick — below the bullish OB wick (for long setups) or above the bearish OB wick (for short setups). A wick that temporarily extends beyond but the candle closes back inside the OB zone is not invalidation — that is often a liquidity sweep before the reaction. Only a candle close beyond the wick constitutes invalidation. Once invalidated, remove the OB from your chart; it no longer carries institutional significance.
Conclusion
Order blocks are the most precise institutional entry tool in Smart Money Concepts. They tell you exactly where large money entered the market, exactly why price returns to those levels, and exactly where to place your entry, stop, and target within a rules-based framework.
But precision requires discipline. The three non-negotiable conditions. The 5-point grading system. The daily structure alignment rule. The stop placement beyond the wick. These are not suggestions — they are the difference between a 52% random outcome and a 65–68% systematic edge.
The three most important things to take from this guide:
-
Three conditions, no exceptions. Last opposing candle, displacement, BOS — all three must be present. If one is missing, the zone is not an OB. Move on.
-
Grade before you trade. Run the 5-point system on every setup before committing capital. Only trade Grade A and above. Grade C setups consume capital and mental energy that should be reserved for Grade A setups.
-
The OB is the entry, not the reason. The reason is higher timeframe structure, institutional logic, and market context. The OB is where you execute. Never enter an OB without first confirming the directional bias, the premium/discount position, and the liquidity context that makes the setup valid.
Master these three principles and the rest of the system — the entry models, the target mechanics, the multi-timeframe framework — will fall into place with practice.
The market leaves its institutional footprints on every chart. You now know exactly what to look for.
Related Articles
- Smart Money Concepts: The Complete Mastery Guide — The complete SMC framework that explains why order blocks exist and how they fit within the broader institutional trading system
- SMC Market Structure: BOS, CHoCH and Strong vs Weak Levels — The structural context required to validate every order block — without BOS confirmation, no OB is valid
- Fair Value Gaps: The Complete Mastery Guide — The complementary institutional footprint that, when overlapping with an OB, creates the highest-probability setup in SMC
- Liquidity Sweeps: The Complete Mastery Guide — How liquidity sweeps before an OB dramatically increase setup quality and confirm institutional involvement
- Premium and Discount Zones: Complete SMC Guide — How to verify that your order block sits in the correct half of the price range before entering
- Accumulation, Manipulation, Distribution (AMD Cycle) — The three-phase institutional cycle that explains exactly when and why order blocks form and get retested
Disclaimer: This article is for educational purposes only and does not constitute financial or investment advice. Stock trading involves significant risk of loss. Past performance of any strategy does not guarantee future results. Always use proper risk management and capital you can afford to lose.
Continue Reading

